Set Alpha Node

Set Alpha Node.
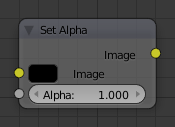
This node adds an alpha channel to an image.
Inputs
- Image
- Standard image input.
- Alpha
- The amount of Alpha can be set for the whole image by using the input field or per pixel by connecting to the socket.
Properties
This node has no properties.
Outputs
- Image
- Standard image output.
Note
This is not, and is not intended to be, a general-purpose solution to the problem of compositing an image that does not contain Alpha information. You might wish to use “Chroma Keying” or “Difference Keying” (as discussed elsewhere) if you can. This node is most often used (with a suitable input being provided by means of the socket) in those troublesome cases when you cannot, for some reason, use those techniques directly.
Example
Fade To Black
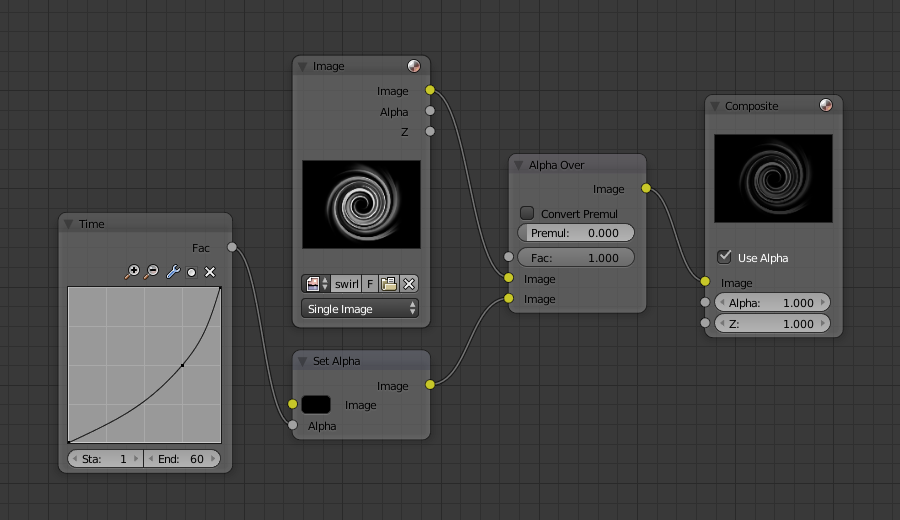
To transition the audience from one scene or shot to another, a common technique is to “fade to black”. As its name implies, the scene fades to a black screen. You can also “fade to white” or whatever color you wish, but black is a good neutral color that is easy on the eyes and intellectually “resets” the viewer’s mind. The node map below shows how to do this using the Set Alpha node.

Fade To Black.
In the example above, the alpha channel of the swirl image is ignored. Instead, a time node introduces a factor from 0.00 to 1.00 over 60 frames, or about 2 seconds, to the Set Alpha node. Note that the time curve is exponentially-shaped, so that the overall blackness will fade in slowly and then accelerate toward the end. The Set Alpha node does not need an input image; instead, the flat (shadeless) black color is used. The Set Alpha Node uses the input factor and color to create a black image that has an alpha set which goes from 0.00 to 1.00 over 60 frames, or completely transparent to completely opaque. Think of alpha as a multiplier for how vivid you can see that pixel. These two images are combined by our trusty Alpha Over node completely (a Factor of 1.00) to produce the composite image. The Set Alpha node will thus, depending on the frame being rendered, produce a black image that has some degree of transparency. Setup and Animate, and you have an image sequence that fades to black over a 2-second period.
Note
No Scene information used
This example node map does not use the Render Layer node. To produce this 2-second animation, no Blender scene information was used. This is an example of using Blender’s powerful compositing abilities separate from its modeling and animation capabilities. (A Render Layer could be substituted for the Image layer, and the “fade-network” effect will still produce the same effect).
Fade In a Title
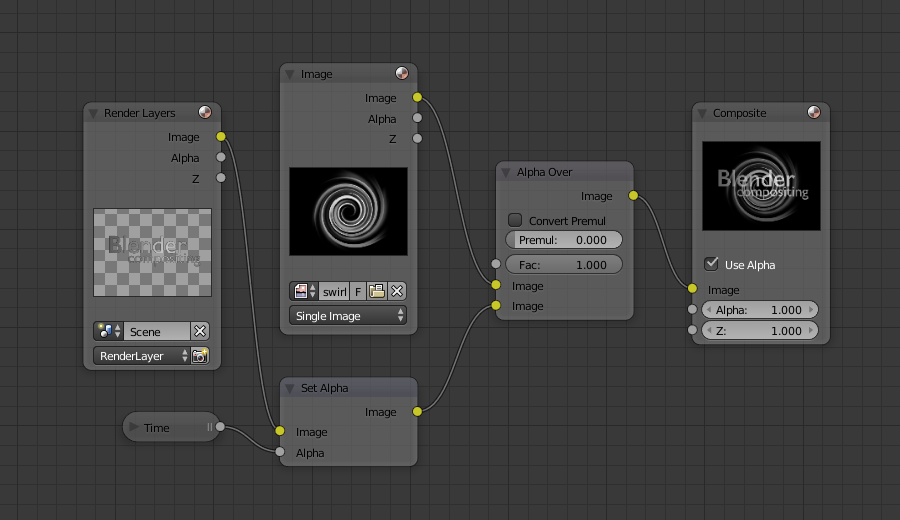
To introduce your animation, you will want to present the title of your animation over a background. You can have the title fly in, or fade it in. To fade it in, use the Set Alpha node with the Time node as shown below.

Using Set Alpha to Fade in a Title.
In the above example, a Time curve provides the Alpha value to the input socket. The current Render Layer node, which has the title in view, provides the image. As before, the trusty Alpha Over node mixes (using the alpha values) the background swirl and the alpha title to produce the composite image. Notice the Convert Premultiplied - checkbox is not enabled; this produces a composite where the title lets the background image show through where even the background image is transparent, allowing you to layer images on top of one another.
Colorizing a BW Image

Using Set Alpha to Colorize an Image.
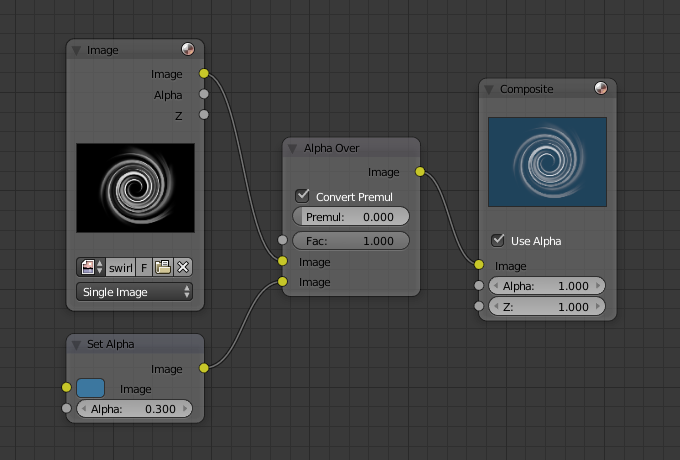
In the example above, notice how the blue tinge of the render input colors the swirl. You can use the Set Alpha node’s color button with this kind of node map to add a consistent color to a BW image.
In the example map to the right, use the Alpha value of the Set Alpha node to give a desired degree of colorization. Thread the input image and the Set Alpha node into an Alpha Over node to colorize any black and white image in this manner. Note the Convert Premultiplied checkbox is enabled, which tells the Alpha Over node not to multiply the alpha values of the two images together.