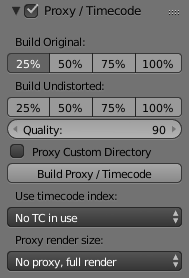
Proxy/Timecode Panel
Once you have chosen the Proxy/Timecode parameters, you need to use to generate the proxy clip and it will be available after Blender makes it.
Proxy

A proxy is a smaller image (faster to load) that stands in for the main image. When you rebuild proxies Blender computes small images (like thumbnails) for the big images and may take some time. After computing them, though, editing functions like scrubbing and scrolling is much faster but gives a low-res result. Make sure to disable proxies before final rendering.
- Build Original
- Used to define which resolutions of proxy images should be built.
- Build Undistorted
- Builds images from undistorted original images for the sizes set above. This helps provide faster playback of undistorted footage.
- Quality
- Defines the quality of the JPEG images used for proxies.
- Proxy Custom Directory
- By default, all generated proxy images are storing to
the
<path of original footage>/BL_proxy/<clip name>folder, but this location can be set by hand using this option. - Rebuild Proxy
- Regenerates proxy images for all sizes set above and regenerate all timecodes which can be used later.
- Timecode
- See Timecode.
- Proxy Render Size
- defines which proxy image resolution is used for display. If Render Undistorted is set, then images created from undistorted frames are used. If there is no generated proxies, render size is set to “No proxy, full render”, and render undistorted is enabled, undistortion will happen automatically on frame draw.
Timecode
When you are working with footage directly copied from a camera without pre-processing it, there might be bunch of artifacts, mostly due to seeking a given frame in sequence. This happens because such footage usually does not have correct frame rate values in their headers. So, for Blender to calculate the position of a needed frame in the stream works inaccurately and can give errant result. There are two possible ways to avoid this:
- Preprocess your video with, say, mencoder to repair file header and insert correct keyframes.
- Use Proxy/Timecode option in Blender.
Options
- Timecode
- Timecode to use on the selected movie strip.
The following timecodes are supported:
- No TC in use- do not use any timecode
- Record Run
- Free Run
- Free Run (rec date)
- Record Run No Gaps
Note
Record Run is the timecode which usually is best to use, but if the clip’s file is totally damaged, Record Run No Gaps will be the only chance of getting acceptable result.