Introduction
Objects Panel
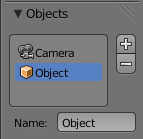
This panel contains a list view with all objects which can be used for tracking, camera or object solving. By default there is only one object in this list which is used for camera solving. It cannot be deleted and other objects cannot be used for camera solving; all added objects are used for object tracking and solving only. These objects can be referenced from Follow Track and Object Solver constraints. Follow Track uses the camera object by default.
If some tracks were added and tracked to the wrong object, they can be copied to another object using and .
The usage for all kind of objects (used for camera and object tracking) is the same: track features, set camera data, solve motion. Camera data is sharing between all objects and refining of camera intrinsics happens when solving camera motion only.
Track Panel
- Name
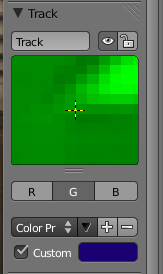
- The track name can be changed with this field. Track names are used for linking tracking data to other areas, like a Follow Track constraint.
- Enable (eye icon)
- This toggle controlled the marker’s enabled flag. If a marker is disabled, its position is not used either by solver nor by constraints.
- Lock (padlock icon)
- The toggle controls whether the track is locked. Locked tracks cannot be edited at all. This helps to prevent accidental changes to tracks which are “finished” (tracked accurate along the whole footage).
Track Preview Widget
The widget in this panel is called “Track Preview” and it displays the content of the pattern area. This helps to check how accurately the feature is being tracked (controlling that there is no sliding off original position) and also helps to move the track back to the correct position. The track can be moved directly using this widget by mouse dragging.
If an anchor is used (the position in the image which is tracking is different from the position which is used for parenting), a preview widget will display the area around the anchor position. This configuration helps in masking some things when there is no good feature at position where the mask corner should be placed. Details of this technique will be written later.
There is small area below the preview widget which can be used to enlarge the vertical size of preview widget (the area is highlighted with two horizontal lines).
Further Options
- Channels
- Tracking happens in gray-scale space, so a high contrast between the feature and its background yields more accurate tracking. In such cases disabling some color channels can help.
- Grayscale Preview (B/W)
- Display the preview image as grayscale even if all channels are enabled.
- Alpha Preview (B/W icon)
- ToDo.
- Weight
When several tracks are used for 3D camera reconstruction, it is possible to assign a reduced weight to some tracks to control their influence on the solution result. This parameter can (and often need to be) animated.
Altering the weights of problem tracking markers can correct or greatly reduce undesirable jumps as feature disappear or become difficult to track.
Another use of Track Weights is when you want to reconstruct a scene from your camera solution. In that case you can first carefully track and solve your scene, and once you’re done, lock all your markers with
Ctrl-L, set the tracker weight in the Extra Settings of the tracker settings to zero and use the feature detection to quickly add lots of markers. Now track them and solve the scene again. Since their weight is zero they will not influence your solution at all, but you will have lots of good reference points in your scene.- Stabilization Weight
- While Weight parameter is used for 3D reconstruction, the Stabilization Weight is used to control 2D stabilization.
- Color Presets
- The preset for the Custom Color.
- Custom Color
- This setting overrides the default marker color used in the clip editor and 3D View, and it helps to distinguish different type of features (for example, features in the background vs. foreground and so on). Color also can be used for “grouping” tracks so a whole group of tracks can be selected by color using the Select Grouped operator.
Tip
To select good points for tracking, use points in the middle of the footage timeline and track backwards and forwards from there. This will provide a greater chance of the marker and point staying in the camera shot.
Plane Track Panel
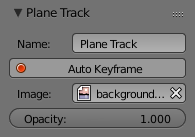
Its properties are shown only when a plane track is selected. Firstly, the name of the selected plane track is shown. It can also be changed from here.
- Auto Keyframe
- Toggles the auto-keyframing for corners of the plane track. With this enabled, keyframes will automatically get inserted when any corner is moved.
- Image
- Field to select an image which will be displayed inside the plane track. This image is for preview purposes in movie clip editor only. To include it in your final render, see Plane Track Deform node.
- Opacity
- Used to set the opacity of this image. Again, this is for display purposes only, and will not affect your final render.
Tracking Settings Panel
This panel contains tracker settings for each marker.
Grease Pencil Panel
Grease pencil strokes can be enabled/disabled with the checkbox in the panel header. It is a standard grease pencil panel where new grease pencil layers and frames can be controlled. There is one difference in the behavior of the grease pencil from other areas – when a new layer is created “on-demand” (when making a stroke without adding a layer before this) the default color for the layer is set to pink. This makes the stroke easy to notice on all kinds of movies.


