Speed Control
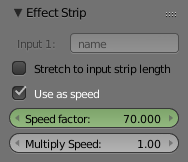
Speed Control time-warps the strip, making it play faster or slower than it normally would. A Global Speed less than 1.0 makes the strip play slower; greater than 1. 0 makes it play faster. Playing faster means that some frames are skipped, and the strip will run out of frames before the end frame. When the strip runs out of frames to display, it will just keep repeating the last one; action will appear to freeze. To avoid this, position the next strip under the original at a point where you want motion to continue.
Options
- Stretch to Input Strip Length
- Todo.
- Use as Speed
- Speed Factor Todo.
- Scale to Length
- Todo.
- Multiply Speed
- Todo.
Examples
Creating a Slow-Motion Effect
Suppose you want to slow your strip down.
You need to affect the speed of the video clip without affecting the overall frame rate.
Select the clip and effect strip.
Click to drop it and press N to get the Properties.
Uncheck the Stretch to input strip length option in the Effect Strip section.
Set the Speed factor to be the factor by which you want to adjust the speed.
To cut the displayed speed by 50%, enter 0.5.
Now, a 275-frame clip will play at half speed, and thus display only the first 137 frames.
If you want the remaining frames to show in slow-motion after the first set is displayed, double the Length of the source strip (since effects strip bounds are controlled by their source strips). If you are using a speed factor other than 0.5 then use the formula:
new_length = real_length / speed_factor
That is it, set your render to animate (in this example) all 550 frames.
Keyframing the Speed Control

Keyframing the Frame number.
To get even finer control over your clip timing, you can use curves! While it is possible to keyframe the Speed factor, usually you want to keyframe the Frame number directly.
Uncheck Stretch to input strip length and uncheck Use as speed. You now have a Frame number button which you can keyframe. If you want the strip to animate at all you will have to insert some keyframes, otherwise it will look like a still. In most cases you will want to use the Graph editor view to set the curve interpolation to Linear since the default Bézier will rarely be what you want.
If you do choose to keyframe the Speed factor instead, remember to click the Refresh Sequencer button in the header of the Video Sequence Editor’s strip view or your changes will not take effect.
Changing Video Frame Rates
You can use the speed control to change the frames per second (fps), or framerate, of a video.
If you are rendering your video to a sequence set,
you can effectively increase or decrease the number of individual image files created,
by using a Global Speed value less than or greater than one, respectively. For example,
if you captured a five-minute video at 30 fps and wanted to transfer that to film,
which runs at 24 fps, you would enter a Global Speed of 30/24, or 1.25
(and Enable Frame Blending to give that film blur feel).
Instead of producing 5 × 60 × 30 = 9000 frames,
Blender would produce 9000/ 1.25 = 7200 = 5 × 60 × 24 frames.
In this case, you set a start = 1 and end = 7200, set your Format output to jpeg 30fps,
and image files 0001.jpg through 7200.jpg would be rendered out,
but those images cover the entire 9000 frames. The image file 7200.jpg is the same a frame 9000.
When you read those images back into your film blend-file at 24 fps, the strip will last exactly 5 minutes.
