HMD view
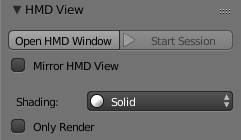
In the properties region, there is a option to create a window for Head Mounted Displays to preview content in Virtual Reality.

HMD Panel in properties.
HMD View
- Open HMD Window
- Opens a HMD Window to be use on your device.
- Start Session
- Starts the HMD Session tracking the device. This will fullscreen the window to the screen it is dragged on.
- Mirror HMD View
- Link the orientation of this parcitular viewport to match the HMD one.
- Shading
- Select the shading type for the HMD Window.
Device Setup
First, make sure your device is compatible with your version of Blender here. Then make sure no other services are using the device (other drivers, applications). Currently, just extended mode (Using the HMD as a second display) is supported. Make sure the orientation of the display is Landscape as some devices (Like the Oculus DK2) are rotated 90 degrees.
Linux
For Linux, make sure you have set the correct Udev rules.
Mac
Should be fine out of the box, make sure no other services (old Oculus driver or such) are active.
Windows
If a device does not show up, make sure no other services or drivers are running and try running Blender with Administrator permissions.
- Oculus
- If the official oculus drivers are installed, you have to enable extended mode using the “DirectDisplayConfig.exe” provided by OVR. This works for the DK2 and the CV1.
User Preferences
Settings such as IPD (Inter-Pupillary Distance), and others can be found in the User Preferences.
- Device
- List of detected HMD devices.
- Rotation from HMD
- Toggle updating the rotation of the camera.
- IPD from HMD
- When disabled, allows you to set the IPD manually.
- Custom IPD
- Set a IPD value for your device, if the HMD has a hardware method for this, please use this first.