Outliner

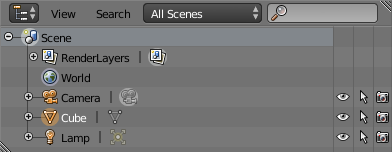
The Outliner editor.
The Outliner is a list that organizes data in the blend-file. i.e. the scene data and also the User Preferences.
Usage
- View the data in the scene.
- Select and deselect objects in the scene.
- Hide or show an object in the scene.
- Enable or disable selection (to make an object “unselectable” in the 3D View).
- Enable or disable the rendering of an object.
- Delete objects from the scene.
- Unlink data (equivalent to pressing the X button next to the name of a data-block).
- Easily select which render layer to render.
- Easily select which render pass to render (for example, you can choose to render just the Specular pass).
Tree View
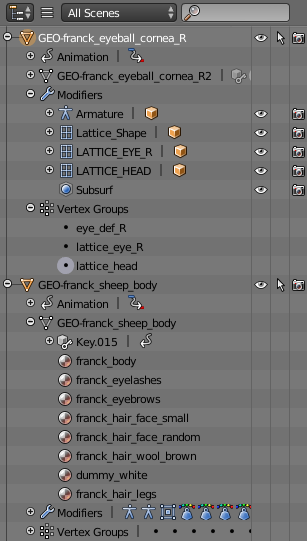
Each row in the Outliner shows a data-block. You can click the plus-sign to the left of a name to expand the current data-block and see what other data-blocks it contains.
You can select data-blocks in the Outliner, but this will not necessarily select the data-block in the scene. To select the data-block in the scene, you have to activate it.
Selecting and Activating
Single selection does not require any pre-selection: just work directly with LMB
(and/or RMB – contextual menu, see below) inside the name/icon area.
When you select an object in the list this way, it is selected and becomes the active object in all other 3D Views.
Activating a data-block
To “activate” the data-block with LMB on the icon of the data-block.
Activating the data-block will automatically switch to the relevant mode.
For example, activating the mesh data of the cube will select the cube
and enter Edit Mode while activating the object data of the
cube will select the cube and enter Object Mode (see right).
Selecting a group of data-blocks
Useful when you want to select/deselect a whole bunch of data-blocks. For this you must prepare the selection using, to your liking:
RMBorLMB,Shift-RMBorShift-LMB,RMBand drag orLMBand drag,
all outside the name/icon area. Those pre-selected have their line in a lighter color.
You then can (de)select them with a RMB on the name/icon area,
which brings on a context menu (see bellow).
A to select/deselect all open items.
Selection of a data-block.
Object-level Restrictions
The three following toggles, in the right side of the Outliner editor,
are available for objects, modifiers and constraints.
When holding Ctrl all its child objects are affected as well.
- Visibility (eye icon)
- Toggles the visibility of the object in the 3D View.
Vwill toggle this property for any objects that are selected in the Outliner. - Selectability (mouse cursor icon)
- This is useful for if you have placed something in the scene
and do not want to accidentally select it when working on something else.
Swill toggle this property for any objects that are selected in the Outliner. - Rendering (camera icon)
- This will still keep the object visible in the scene, but it will be ignored by the renderer.
Rwill toggle this property for any objects that are selected in the Outliner.
Header
Display Mode
The editors header has a select menu that let you filter what the Outliner should show. It helps to narrow the list of objects so that you can find things quickly and easily.
- All Scenes
- Shows everything the Outliner can display (in all scenes, all layers, etc.)
- Current Scene
- Shows everything in the current scene.
- Visible Layers
- Shows everything on the visible (currently selected) layers in the current scene. Use the layer buttons to make objects on a layer visible in the 3D View.
- Selected
- Lists the object(s) that are currently selected in the 3D View. See selecting in the 3D View for more information.
- Active
- Lists only the active (often last selected) object.
- Same Types
- Lists only those objects in the current scene that are of the same types as those selected in the 3D View.
- Groups
- Lists only Groups and their members.
- Sequence
- Lists data-block that are used by the Sequencer.
- Blender File
- Lists all data in the current blend-file.
- Data-Blocks
- Lists every data-block along with any properties that they might have.
- User Preferences
- Lists options that can be found in the User Preferences along with some other settings.
- Orphan Data
- Lists data-blocks which are unused and/or will be lost when the file is reloaded.
Searching
You can search the view for data-blocks, by using Search field in the header of the Outliner, The Search menu lets you toggle the following options:
- Case Sensitive Matches Only
- Complete Matches Only
Example

The Outliner with different kind of data.