Layers
Reference
M3D scenes often become exponentially more confusing as they grow more complex. Sometimes the artist also needs precise control over how individual objects are lit, and does not want lights for one object to affect nearby objects. For this and other reasons below, objects can be placed into one or more “layers”. Using object layers, you can:
- Selectively display objects from certain layers in your 3D View, by selecting those layers in the 3D View header. This allows you to speed up interface redrawing, reduce virtual-world clutter, and help improve your workflow.
- Control which lights illuminate an object, by making a light illuminate only the objects on its own layer(s).
- Control which forces affect which particle systems, since particles are only affected by forces and effects on the same layer.
- Control which layers are rendered (and hence, which objects), and which properties/channels are made available for compositing by using render layers.
Armatures can also become very complex, with different types of bones, controllers, solvers, custom shapes, and so on. Since armatures are usually located close together, this can quickly become cluttered. Therefore, Blender also provides layers just for armatures. Armature layers are very similar to object layers, in that you can divide up an armature (rig) across layers and only display those layers you wish to work on.
See also
Working with Layers
3D layers differ from the layers you may know from 2D graphics applications as they have no influence on the drawing order and are there (except for the special functions listed above) mainly to allow you to organize your scene.
When rendering, Blender only renders the selected layers. If all your lights are on a layer that is not selected, you will not see anything in your render except for objects lit by ambient lighting.
Groups and Parents are other ways to logically group related sets of objects.
Viewing layers
Blender provides twenty layers whose visibility can be toggled with the small unlabeled
buttons in the header (see 3D View layer buttons). To select a single layer,
click the appropriate button with LMB; to select more than one,
use Shift-LMB - doing this on an already active layer will deselect it.

3D View layer buttons.
To select layers via the keyboard, press 1 to 0
(on the main area of the keyboard) for layers 1 through 10 (the top row of buttons),
and Alt-1 to Alt-0 for layers 11 through 20 (the bottom row).
Use Shift for multiple (de)selection works for these shortcuts too.
You can select or deselect all Scene Layer buttons at once by pressing \.
Locking to the scene
By default, the lock button directly to the right of the layer buttons is enabled. This means that changes to the viewed layers affect all other 3D Views locked to the scene. See the navigating the 3D View options page for more information.
Multiple Layers
An object can exist on multiple layers. For example, a lamp that only lights objects on a shared layer could “be” on layers 1, 2, and 3. An object on layers 3 and 4 would be lit, whereas an object on layers 4 and 5 would not. There are many places where layer-specific effects come into play, especially lights and particles.
Moving objects between layers

Layer selection.
To move selected objects to a different layer,
press M and then select the layer you want from the pop-up menu.
Objects can also be on more than one layer at a time. To have an object on multiple layers,
hold Shift while clicking.

Selection in the Object tab.
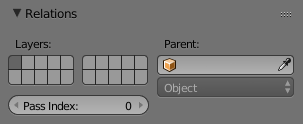
Another way to view or change a selected object layer is via the Relations panel, in the Object tab.

Layers in Object tab, Relations panel.
You will then see the layer buttons in the Relations panel – as before – the object
can be displayed on more than one layer by clicking Shift-LMB.