Clear & Apply
Clear
Clearing transforms simply resets the transform values. The objects location and rotation values return to 0, and the scale returns to 1.
Reference
Alt-G, Alt-S, Alt-R, Alt-OOptions
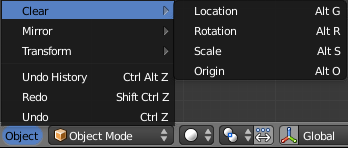
Clear Transformation menu.
- Clear Location
Alt-G - Clear (reset) the location of the selection. This will move the selection back to the coordinates (0, 0, 0).
- Clear Scale
Alt-S - Clear (reset) the scale of the selection. This will resize the selection back to the size it was when created.
- Clear Rotation
Alt-R - Clear (reset) the rotation of the selection. This will set the rotation of the selection to 0 degrees in each plane.
- Clear Origin
Alt-O - Clears (resets) the offset of the child objects origin. This will cause child objects to move to the origin of the parent.
Apply
These operations lets you apply several transformations to the selected objects. The object transformation coordinates are transferred to the object data. If the objects have hierarchical descendants, it also applies those transformations to their children.
Apply Object Transformations
Reference
Ctrl-AApplying transform values essentially resets the values of object’s position, rotation, or scale, but does not actually do anything to the object. The object origin point is moved to the global origin and the transform values are set to zero. In terms of scale, the scale values return to 1.
To apply a transform select the Apply sub-menu from the Object menu or
use the shortcut Ctrl-A and select the appropriate transform to apply.
The Operator panel lets you choose the combination of transformations to apply.
Warning
Armature Objects
While applying transformation to armatures is supported, this does not apply to their pose position, animation curves or constraints.
This tool should be used before rigging and animation.
Options
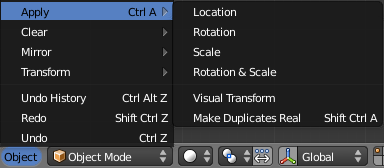
Apply Transformation menu.
- Location
- Apply (set) the location of the selection. This will make Blender consider the current location to be equivalent to 0 in each plane i.e. the selection will not move, the current location will be considered to be the “default location”. The Object origin will be set to actual (0, 0, 0) (where the colored axis lines intersect in each view).
- Rotation
- Apply (set) the rotation of the selection. This will make Blender consider the current rotation to be equivalent to 0 degrees in each plane i.e. the selection will not rotated, the current rotation will be considered to be the “default rotation”.
- Scale
- Apply (set) the scale of the selection. This will make Blender consider the current scale to be equivalent to 0 in each plane i.e. the selection will not scaled, the current scale will be considered to be the “default scale”.
- Rotation and Scale
- Apply (set) the rotation and scale of the selection. Do the above two applications simultaneously.
Transforms to Deltas
Reference
Alt-Shift-G, Alt-Shift-R, and Alt-Shift-SClear both the normal and Delta transforms.
- Location to Deltas
Alt-Shift-G - Rotation to Deltas
Alt-Shift-R - Scale to Deltas
Alt-Shift-S
- All Transforms to Deltas
- Converts all “normal” transformations to delta transforms.
- Reset Values
- ToDo.
- Animated Transform to Deltas
- Converts the “normal” transformation animations (animations done to the translation,
scale, and rotation values) to Delta transforms.
To use this tool simply select the object with the animations that you want to convert press
Ctrl-Aand select Animated Transform to Deltas.
Visual Transform
Reference
Ctrl-AApply (set) the result of a constraint and apply this back to the Object’s location, rotation and scale.
Make Duplicate Real
Reference
Shift-Ctrl-AMake Duplicates Real unlinks linked duplicates so each duplicate now has its own data-block.
- Parent
- Parents all the generated objects to the former duplicator when the option is checked; otherwise, they will be global objects.
- Keep Hierarchy
- If this option is checked, the internal hierarchies (i.e. parent relationships) will be preserved in the newly generated objects, even if Parent is also checked, in which case, only the duplicated objects on top of the hierarchy will be parented to the former duplicator.