Layers
Reference
Grease Pencil sketches are organized in layers, much like the image layers in the GIMP or Photoshop®. These layers are not related to any of the other layer systems in Blender.
The layers’ main purpose is to gather sketches that are related in some meaningful way (e.g. “blocking notes”, “director’s comments on blocking”, or “guidelines”). For this reason, all the strokes on a layer (not just those made after a particular change) are affected by that layer’s color, opacity, and stroke thickness settings.
Layers are managed in the Grease Pencil Panel of the Properties region N shown here.
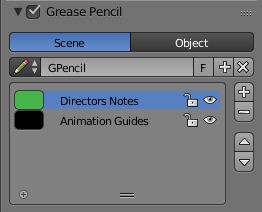
Grease Pencil Panel.
Grease Pencil Data
Use the following controls to Add, Remove or adjust the position of a layer in the list.
- Source
- Scene
- Grease Pencil data is attached to the current scene is used, unless the active object already has Grease Pencil data (i.e old files).
- Object
- Grease Pencil data is attached to the active object are used. This is required when using pre 2.73 add-ons.
- Grease Pencil
- Used to select the Grease Pencil data-block to use for layers. For controls see Data-Block Menu.
- Active Layer
A List Views & Presets of layers attached to each scene or object.
- Parent (bone icon)
- Indicates that a parent has been set for the layer.
- Lock (padlock icon)
- Locks the ability to edit the current layers layer.
- Hide (eye icon)
H - Hides the current layer in the drawing region.
- Unlock Color (palette with arrow icon)
- Unprotects selected colors from further editing and/or frame changes.
- Isolate (padlock icon)
NumpadAsterix - To restrict editing to the active layer only.
- Isolate (visible) (eye icon)
- An option of Isolate to also affect the visibility.
- Specials
- Duplicate Layer
- Creates a copy of the current layer.
- Show All
Alt-H - Makes all hidden layers visible.
- Hide Others
Shift-H - Makes all non selected layers hidden.
- Lock/Unlock All
- Locks/Unlocks all of the layers. This can be useful to prevent unwanted editing.
- Merge Down
- Merges the current layer with the layer below it.
Note
By default, most operations occur only on the active layer highlighted in the list.
Appearance Settings
These settings can be used to change how the active layer appears.
- Opacity
- The transparency of the layer.
- X-Ray
- Makes the lines visible when they pass behind other objects in the scene.
- Show Points
- Draws the start/end points that make up the stroke.
- Tint
- Color
- The color to tint the layer.
- Factor
- The amount that the Tint Color has on the layer.
- Thickness Change
A relative change in pixels to apply to the thickness of all stroke in the active layer (works like a modifier).
- Apply (hand and bulged in blue line icon)
- If the apply button is pressed, the thickness change is applied and the value is reset to zero.
Animation
- Parent
An Data ID to select the parent object. The strokes of the layer will follow parent transformations.
- Type
Type of parent relation.
Object, Armature, Bone
- Lock Frame
- Locks the current frame displayed by layer.
- Delete Frame
- Deletes the active frame for the active Grease Pencil Layer.
Onion Skinning
Onion-skinning, also known as ghosting, helps an animator by displaying the neighboring frames as a faded trail.
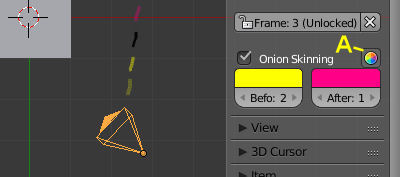
Grease Pencil Onion Skinning.
- Onion Skinning
- Checkbox to enable onion skinning.
- Always Use (camera icon)
- If enabled ghosts are displayed when scrubbing the view and/or playing back animation.
- Use Custom Colors (palette icon)
- Toggles to use the Before and After controls to change the color of the ghosted frames.
- Before/After
- Color
- The color of the strokes before/after the current frame.
- Before/After Range
- The maximum number of ghosts to show before/after the current frame. 0 will only show the previous/next sketch, and -1 will not show any frames before/after current.