Introduction
Vertex Groups can potentially have a very large number of associated vertices and thus a large number of weights (one weight per assigned vertex). Weight Painting is a method to maintain large amounts of weight information in a very intuitive way.
It is primarily used for rigging meshes, where the vertex groups are used to define the relative bone influences on the mesh. But we use it also for controlling particle emission, hair density, many modifiers, shape keys, etc.
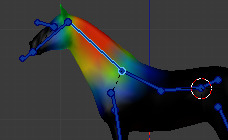
Vertex Group in Weight Paint Mode.
You enter Weight Paint Mode from the Mode Menu Ctrl-Tab.
The selected Mesh Object is displayed slightly shaded with a rainbow color spectrum.
The color visualizes the weights associated to each vertex in the active Vertex Group.
By default blue means unweighted and Red means fully weighted.
You assign weights to the vertices of the Object by painting on it with weight brushes. Starting to paint on a mesh automatically adds weights to the active Vertex Group (a new Vertex Group is created if needed).
The Weighting Color Code
Weights are visualized by a gradient using a cold/hot color system, such that areas of low value (with weights close to 0.0) are drawn in blue (cold) and areas of high value (with weights close to 1.0) are drawn in red (hot). And all in-between values are drawn in rainbow colors (blue, green, yellow, orange, red).
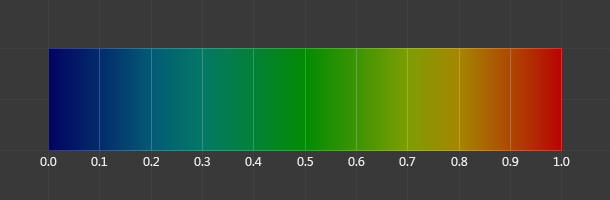
The color spectrum and their respective weights.
In addition to the above described color code, Blender has a special visual notation (as an option) for unreferenced vertices: They are drawn in black. Thus you can see the referenced areas (drawn in cold/hot colors) and the unreferenced areas (in black) at the same time. This is most practical when you look for weighting errors. See Options.
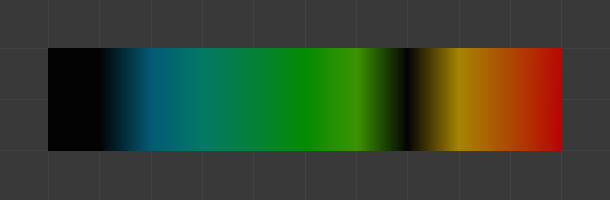
Unreferenced vertices example.
Note
You can customize the colors in the weight gradient by enabling Custom Weight Paint Range in the System tab of the User Preferences.
Usage
Weight Painting for Bones
This is one of the main uses of weight painting. When a bone moves, vertices around the joint should move as well, but just a little, to mimic the stretching of the skin around the joint. Use a “light” weight (10 - 40%) paint on the vertices around the joint so that they move a little when the bone rotates. While there are ways to automatically assign weights to an armature (see the Armature section), you can do this manually. To do this from scratch, refer to the process below. To modify automatically assigned weights, jump into the middle of the process where noted:
- Create an armature.
- Create a mesh that will be deformed when the armature’s bone(s) move.
- With the mesh selected, create an Armature modifier for your mesh (located in the Properties editor, Modifiers tab). Enter the name of the armature.
Pick up here for modifying automatically assigned weights.
- Select the armature in 3D View, and bring the armature to Pose Mode
with
Ctrl-Tab, or the 3D View header mode selector. - Select a desired bone in the armature.
- Select your mesh with
RMBand change immediately to Weight Paint Mode. The mesh will be colored according to the weight (degree) that the selected bone movement affects the mesh. Initially, it will be all blue (no effect). - Weight paint to your heart’s content. The mesh around the bone itself should be red (generally) and fade out through the rainbow to blue for vertices farther away from the bone.
When you select a bone of the armature (which remained in Pose Mode),
it will activate the corresponding vertex group and display related weights.
You can only select one bone at a time in this mode (so Shift-LMB clicking does not work).
Tip
If the mesh skins the bones, you will not be able to see the bones because the mesh is painted. If so, turn on X-Ray view ().
If you paint on the mesh, a vertex group is created for the bone. If you paint on vertices outside the group, the painted vertices are automatically added to the vertex group.
If you have a symmetrical mesh and a symmetrical armature you can use the option X-Mirror. Then the mirrored groups with the mirrored weights are automatically created.
Weight Painting for Particles
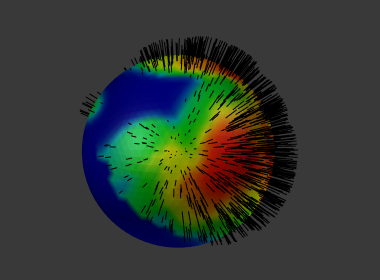
Weight painted particle emission.
In example faces or vertices with zero weight generate no particles. A weight of 0.1 will result in 10% of the amounts of particles. This option “conserves” the total indicated number of particles, adjusting the distributions so that the proper weights are achieved while using the actual number of particles called for. Use this to make portions of your mesh hairier than others by weight painting a vertex group, and then calling out the name of the vertex group in the Vertex Groups panel .