Skeleton

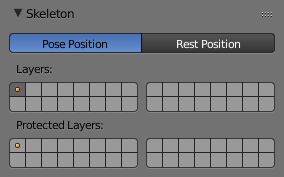
The Skeleton panel.
In this panel you can arrange sets of bones into different layers for easier manipulation.
Position
A radio button to switch between Pose Position and Rest Position.
Whereas in Edit Mode, you always see your armature in its rest position, in Object Mode and Pose Mode you see it by default in its Pose Position (i.e. as it was transformed in the Pose Mode). If you want to see it in the rest position in all modes, enable the Rest Position button in the Armature tab (Edit Mode).
Armature Layers
Reference
Each armature has 32 “Armature layers” which allow you to organize your armature by “regrouping” sets of bones into layers; this works similar to scene layers (those containing your objects). You can then “move” a bone to a given layer, hide or show one or several layers, etc.
Showing/hiding bone layers
Only bones in active layers will be visible/editable, but they will always be effective (i.e move objects or deform geometry), whether in an active layer or not. To (de)activate a layer, you have several options, depending in which mode you are in:
- In all modes, use the row of small buttons at the top of the Display Options group, Armature panel.
If you want to enable/disable several layers at once, as usual, hold
Shiftwhile clicking... - In Edit Mode and Pose Mode, you can also do this from the 3D View,
either by using the menu or
, or the
Shift-Mshortcut, to display a small pop-up menu containing the same buttons as described above (here again, you can useShift-LMBclicks to (de)select several layers at once).
Protected Layers
You can lock a given bone layer for all proxies
of your armature, i.e. all bones in this layer will not be editable.
To do so, in the Skeleton panel, Ctrl-LMB click on the relevant button, the layer lock will be enabled.
Protected layers in proxy are restored to proxy settings on file reload and undo.