Video Output
Preparing your work for video
Once you have mastered the trick of animation you will surely start to produce wonderful animations, encoded with your favorite codecs, and possibly you will share them on the Internet with the rest of the community.
Sooner or later you will be struck with the desire to build an animation for television, or maybe burn your own DVDs. To spare you some disappointment, here are some tips specifically targeted at Video preparation. The first and principal one is to remember the double-dashed white lines in the camera view!
If you render for PC then the whole rendered image which lies within the outer dashed rectangle will be shown. For television, some lines and some part of the lines will be lost due to the mechanics of the electron beam scanning in your TV’s cathode ray tube. You are guaranteed that what is within the inner dashed rectangle in camera view will be visible on the screen. Everything within the two rectangles may or may not be visible, depending on the given TV set that your audience watches the video on.
Color Saturation
Most video tapes and video signals are not based on the RGB model but on the YCrCb model: more precisely, the YUV in Europe (PAL), and the YIQ in the USA (NTSC), the latter being quite similar to the former. Hence some knowledge of this is necessary too.
The YCrCb model sends information as ‘Luminance’, or intensity (Y) and two ‘Crominance’ signals, red and blue (Cr and Cb). Actually a Black and White TV set shows only luminance, while color TV sets reconstruct color from Crominances (and from luminance). Construction of the YCrCb values from the RGB ones takes two steps (the constants in italics depend on the system: PAL or NTSC):
First, the Gamma correction (g varies: 2.2 for NTSC, 2.8 for PAL):
- R’ = R1/g
- G’ = G1/g
- B’ = B1/g
Then, the conversion itself:
- Y = 0.299R’ + 0.587G’ + 0.114B’
- Cr = a1 (R’ - Y) + b1 (B’ - Y)
- Cb = a2 (R’ - Y) + b2 (B’ - Y)
Whereas a standard 24 bit RGB picture has 8 bits for each channel, to keep bandwidth down, and considering that the human eye is more sensitive to luminance than to chrominance, the luminance signal is sent with more bits than the two chrominance signals. This bit expansion results in a smaller dynamic of colors in video, than what you are used to on monitors. You hence have to keep in mind that not all colors can be correctly displayed.
A rule of thumb is to keep the colors as ‘grayish’ or ‘unsaturated’ as possible; this roughly means keeping the dynamics of your colors within 80% of one another. In other words, the difference between the highest RGB value and the lowest RGB value should not exceed 0.8 (0 - 1 range) or 200 (0 - 255 range).
This is not strict, something more than 0.8 is acceptable, but an RGB display with color contrast that ranges from 0.0 to 1.0 will appear to be very ugly (over-saturated) on video, while appearing bright and dynamic on a computer monitor.
Encoding Panel
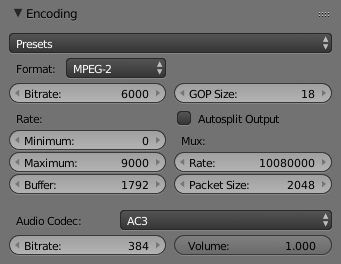
Encoding panel.
Here you choose which video codec you want to use, and compression settings. With all of these compression choices, there is a tradeoff between file size, compatibility across platforms, and playback quality.
When you view the System Console,
you can see some of the output of the encoding process.
You will see even more output if you execute Blender as blender -d.
- Presets
- You can use the presets, which choose optimum settings for you for that type of output.
- Format
Video container or file type. For a list of all available options see video formats.
- Codec
- Chooses the method of compression and encoding. For a list of all available options see video formats.
- Lossless Output
- Allows the ability to perfectly reconstruct compressed data from compressed data.
- Bitrate
- Set the average bitrate (quality), which is the count of binary digits per frame. See also: FFmpeg -b:v.
- GOP Size
- The number of pictures per Group of Pictures. Set to 0 for “intra_only”, which disables inter-frame video. From FFmpeg docs: “For streaming at very low bitrate application, use a low frame rate and a small GOP size. This is especially true for RealVideo where the Linux player does not seem to be very fast, so it can miss frames”.
- Autosplit Output
- If your video is HUGE and exceeds 2Gig, enable Autosplit Output. The main control over output filesize is the GOP or keyframe interlace. A higher number generally leads to a smaller file but needs a higher-powered device to replay it.
- Mux
Multiplexing settings.
- Rate
- Maximum bit rate of the multiplexed stream.
- Packet Size
- Reduces data fragmentation or muxer overhead depending on the source.
Note
Standards
Some codecs cannot encode off-the-wall video sizes, so stick to the XY sizes used in the presets for standard TV sizes.
- Rate
The bitrate control also includes a Minimum and a Maximum.
- Buffer
- The decoder bitstream buffer size.
- Audio Codec
- Audio conainer used, For a list of all available options see video formats.
- Bitrate
- For each codec, you can control the bitrate (quality) of the sound in the movie. Higher bitrates are bigger files that stream worse but sound better. Use powers of 2 for compatibility.
- Volume
- Sets the output volume of the audio.
Tips
Choosing which format to use depends on what you are going to do with the image.
If you are animating a movie and are not going to do any post-processing or special effects on
it, use either AVI-JPEG or AVI Codec and choose the XviD open codec.
If you want to output your movie with sound that you have loaded into the VSE,
use M-PEG.
If you are going to do post-processing on your movie, it is best to use a frameset rendered as “OpenEXR” images; if you only want one file, then choose “AVI Raw”. While AVI Raw is huge, it preserves the exact quality of output for post-processing. After post-processing (compositing and/or sequencing), you should compress the video.
Tip
You do not want to post-process a compressed file because the compression artifacts might throw off what you are trying to accomplish with the post-processing.
Note that you might not want to render directly to a video format. If a problem occurs while rendering, you have to re-render all frames from the beginning. If you first render out a set of static images (such as the default PNG, or the higher-quality OpenEXR), you can stitch them together with an Image Strip in the Video Sequence Editor. This way, you can easily:
- Restart the rendering from the place (the frame) where the problem occurred.
- Try out different video options in seconds, rather than minutes or hours.
- Enjoy the rest of the features of the VSE, such as adding Image Strips from previous renders, audio, video clips, etc.