Screen Capture
Screenshots
Reference
Ctrl-F3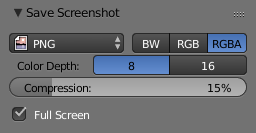
Save Screenshot Option.
Ctrl-F3 will take a screenshot of Blender and then open the File Browser,
allowing you to specify the name and location of the screenshot.
In the example image at the right, the PNG format will be the output of the screenshot taken
(settings are the same as the ones available to save render results).
When the File Browser opens, on the left, there is a tab
called Save Screenshot where you can find format settings and a checkbox with the option
Full Screen.
- Check the Option to save the entire Blender window (full width and height of the Blender window you are using when you call the command).
- Uncheck the box to save only your active area (where your mouse is located when you call the command).
Screencasts
Reference
Alt-F3This is a quick way to make screen-casts from within Blender.
Note
This is limited to a single window and does not support audio.
For recording tutorials you may want to use more comprehensive, 3rd party solutions.
Screencasts will record your actions over time either as a video or sequence of image files.
The type and location of the output are determined by the settings in the
Output panel of the Properties Render tab.
The default settings will generate a screencast consisting of a series of PNG images captured
every 50 ms and stored in the /tmp folder. If you want to record a video, set the
Output to one of the Movie File Formats supported by your system
listed in the Output panel format menu.
If you are unsure what video codecs your system supports, select AVI JPEG.
Note
You can change the frame-rate for a screencast in the User Preferences.
When you start Blender Screencasts, the header of the Info Editor will change, and it will show you a button for stopping your capture.

Info Header with the Capture Stop Button.
Note
The only way to stop the Screencast
Pressing the Stop button in the header of the Info Editor is the only way to stop the Screencast capture.
If you press Esc, the shortcut will only work for operations
performed in the Blender User Interface, (it will stop animations, playbacks and so on...),
but will not work to stop Screencasts.
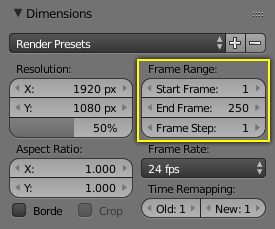
The frames are stored using a suffix added to their file name, where the suffix is composed of the numbers present in the fields for start and end frames, defined in the Frame Range of the Dimensions panel, Render tab. (See Fig. Render ‣ Dimensions Panel ‣ Frame Range highlighted in yellow)
Note
The configuration of the End frame, present in the Frame Range of the Dimensions Panel, will not stop your capture automatically. You will always have to stop the Screencast manually, using the Stop button.
The Videos are generated internally in the same manner as the Screenshots, using the width and height of the Window you are working in. If you choose to capture to a Video file, Blender will have to pass those frames to a Video codec.
Warning
Some codecs limit the output width/height or the video quality:
- When you save your Screencast in an Image format, the Images will be saved using the entire Blender Window, with full width and height, and the quality of the Image will be defined by its type (e.g. JPG, PNG, and so on) and configuration (e.g. Slider quality of the .JPG format).
- When you save your Screencast in a Video format, it will be sent to a codec. Depending on the codec limitations, the resulting output Video could be scaled down. Furthermore, some combinations of Window width and height cannot be processed by certain codecs. In these cases, the Screencast will try to start, but will immediately stop. In order to solve this, choose another Window format and/or another codec.
Blender Window Dimension
There is a way to match the Blender Window dimensions with the Output Video File, achieving standard dimensions for the output of the Blender Screencast. (e.g. NTSC, HD, Full HD, etc). You can control the width and height of your Blender Window, starting Blender from a Command Line. To learn more about starting Blender from a command line, see the page about Blender Console Window.