Seams
Introduction
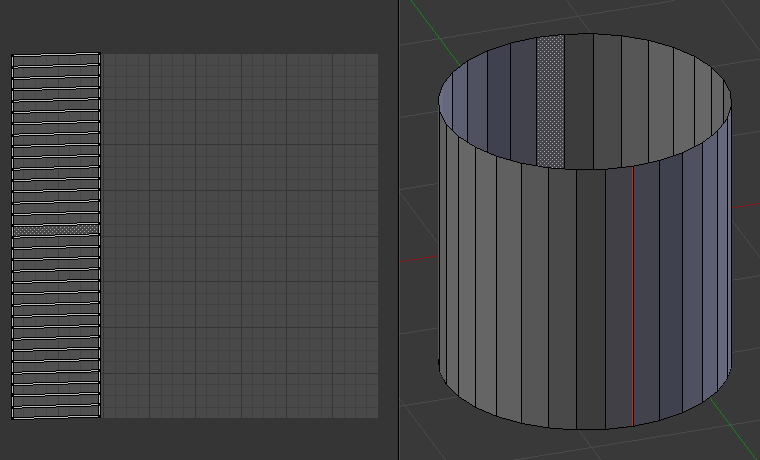
Simple Seam on a Cylinder.
For many cases, using the Unwrap calculations of Cube, Cylinder, Sphere, or best fit will produce a good UV layout. However, for more complex meshes, especially those with lots of indentations, you may want to define a seam to limit and guide any of the unwrapping processes discussed above.
Just like in sewing, a seam is where the ends of the image/cloth are sewn together. In unwrapping, the mesh is unwrapped at the seams. Think of this method as peeling an orange or skinning an animal. You make a series of cuts in the skin, then peel it off. You could then flatten it out, applying some amount of stretching. These cuts are the same as seams.
When using this method, you need to be aware of how much stretching there is. The more seams there are, the less stretching there is, but this is often an issue for the texturing process. It is a good idea to have as few seams as possible while having the least amount of stretching. Try to hide seams where they will not be seen. In productions where 3D paint is used, this becomes less of an issue, as projection painting can easily deal with seams, as opposed to 2D texturing, where it is difficult to match the edges of different UV islands.
The workflow is the following:
- Create seams. A seam is marked in Edit Mode by selecting edges to make the seam and then issuing the Mark Seam operator.
- Unwrap.
- Adjust seams and repeat.
- Manually adjust UVs. See the next section on Editing UVs.
Marking Seams
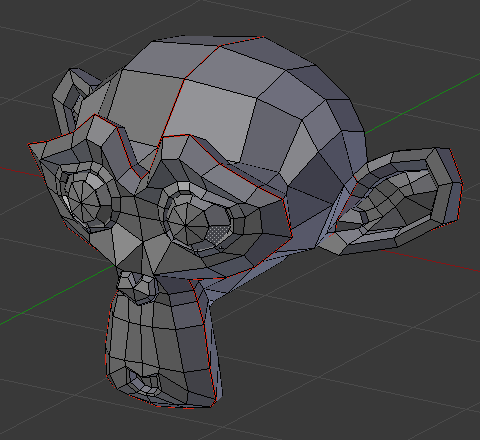
Seamed Suzanne.
To add an edge to a seam,
simply select the edge and Ctrl-E Mark Seam.
To take an edge out of a seam, select it, Ctrl-E and Clear Seam.
In the example to the right, the back-most edge of the cylinder was selected as the seam (to hide the seam), and the default unwrap calculation was used. In the UV/Image Editor, you can see that all the faces are nicely unwrapped, just as if you cut the seam with a scissors and spread out the fabric.
When marking seams, you can use the or Ctrl-L in
Face Select Mode to check your work.
This menu option selects all faces connected to the selected one, up to a seam.
If faces outside your intended seam are selected, you know that your seam is not continuous.
You do not need continuous seams, however, as long as they resolve regions that may stretch.
Just as there are many ways to skin a cat, there are many ways to go about deciding where seams should go. In general though, you should think as if you were holding the object in one hand, and a pair of sharp scissors in the other, and you want to cut it apart and spread it on the table with as little tearing as possible. Note that we seamed the outside edges of her ears, to separate the front from the back. Her eyes are disconnected sub-meshes, so they are automatically unwrapped by themselves. A seam runs along the back of her head vertically, so that each side of her head is flattened out.
Another use for seams is to limit the faces unwrapped. For example, when texturing a head, you do not really need to texture the scalp on the top and back of the head since it will be covered in hair. So define a seam at the hairline. Then, when you select a frontal face, and then select linked faces before unwrapping, the select will only go up to the hairline seam, and the scalp will not be unwrapped.
When unwrapping anything that is bilateral, like a head or a body, seam it along the mirror axis. For example, cleave a head or a whole body right down the middle in front view. When you unwrap, you will be able to overlay both halves onto the same texture space, so that the image pixels for the right hand will be shared with the left; the right side of the face will match the left, etc.
Note
You do not have to come up with “one unwrapping that works perfectly for everything everywhere.” As we will discuss later, you can easily have multiple UV unwrappings, using different approaches in different areas of your mesh.