Introduction
This page covers the basics of curve editing.
Transform
A Bézier curve can be edited by transforming the locations of both control points and handles. NURBS curve on the other hand have only control points.
Translation, Rotation, Scale
Reference
G, R, SLike other elements in Blender, curve control points and handles can be grabbed/moved G,
rotated R or scaled S
as described in the Basic Transformations section.
When in Edit Mode, proportional editing
is also available for transformation actions.
Transform Panel
Reference
When nothing is selected, the panel is empty. When more than one vertex is selected, the median values is edited and “Median” is added in front of the labels.
- Control Point, Vertex
- The first controls (X, Y, Z) show the coordinates of the selected point or handle (vertex). In case of a NURBS curve, there is a fourth component available (W), which defines the weight of the selected control point or the median weight.
- Space
The Space radio buttons let you choose if those coordinates are relative to the object origin (local) or the global origin (global).
Global, Local
Data
- Weight
- ToDo.
- Radius
- Radius is used for beveling.
- Tilt
- ToDo.
Tools
Reference
The To Sphere, Shear, Warp and Push/Pull transform tools are described in the Transformations sections. The two other tools, Tilt and Shrink/Fatten Radius are related to Curve Extrusion.
Mirror
Reference
Ctrl-MThe Mirror tool is also available, behaving exactly as with mesh vertices.
Snap
Reference
Shift-SMesh snapping also works with curve components. Both control points and their handles will be affected by snapping, except for within itself (other components of the active curve). Snapping works with 2D curves but points will be constrained to the local XY axes.
Extrude Curve and Move
Reference
EExtrudes points by duplicating the selected points, which then can be translated. If the selection is an end point a new point will be connected to the selected point, else a new unconnected point is created.
- Mode
- ToDo.
Duplicate or Extrude to Cursor
Reference
Ctrl-LMBInteractively places new points with Ctrl-LMB at the cursor position.
With the selection it deals in same manner as the Extrude Curve and Move tool.
Add Duplicate
Reference
Shift-DThis tool duplicates the selected control points, along with the curve segments implicitly selected (if any). If only a handle is selected, the full point will be duplicated too. The copy is selected and placed in Grab mode, so you can move it to another place.
Separate
Reference
PCurve objects that are made of multiple distinct curves can be separated into their own
objects by selecting the desired segments and pressing P.
Note, if there is only one curve in a Curve object,
Separate will create a new Curve object with no control points.
Make Segment
Reference
FConnects two disconnected control points.
The selection must be loose points, or the first/last point of a curve, then press F.
If the points belong to different curves, these are joined by a segment to become a single curve.
Note that you can only join curves of the same type (i.e. Bézier with Bézier, NURBS with NURBS) Additionally, you can close a curve by toggling cyclic.
Toggle Cyclic
Reference
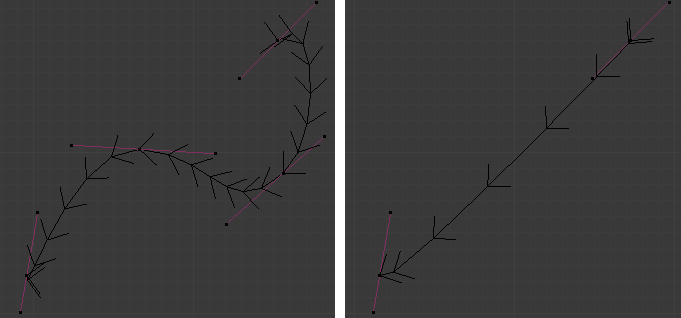
Alt-CThis toggles between an open curve and closed curve (Cyclic). Only curves with at least one selected control point will be closed/open. The shape of the closing segment is based on the start and end handles for Bézier curves, and as usual on adjacent control points for NURBS. The only time a handle is adjusted after closing is if the handle is an Auto one. Fig. Open and Closed curves. is the same Bézier curve open and closed.
This action only works on the original starting control-point or the last control-point added.
Deleting a segment(s) does not change how the action applies;
it still operates only on the starting and last control-points. This means that
Alt-C may actually join two curves instead of closing a single curve! Remember
that when a 2D curve is closed, it creates a renderable flat face.

Open and Closed curves.
Delete
Reference
X, Delete; Ctrl-XOptions for the Erase pop-up menu:
- Vertices
- This will delete the selected control points, without breaking the curve (i.e. the adjacent points will be directly linked, joined, once the intermediary ones are deleted). Remember that NURBS order cannot be higher than its number of control points, so it might decrease when you delete some control point. Of course, when only one point remains, there is no more visible curve, and when all points are deleted, the curve itself is deleted.
- Segment
- Deletes the segment that connects the selected control points and disconnecting them.
- Dissolve Vertices
Ctrl-X - Deletes the selected control points, while the remaining segment is fitted to the deleted curve by adjusting its handles.
Control Points
Tilt
Reference
Ctrl-T, Alt-T- Tilt
Ctrl-T - Lets you define the tilt of the selected control points. The tilt will be interpolated from point to point (you can check it with the normals). The tilt angle is defined interactively first, and then it can be adjusted in the Operator panel Angle.
- Clear Tilt
Alt-T - Brings the tilt of those selected control points back to 0.
Set Handle Type
Reference
VHandle types are a property of Bézier curves and can be used to alter features of the curve. For example, switching to Vector handles can be used to create curves with sharp corners. Read the Bézier curves page for more details.
- Toggle Free/Align
V-T - Additionally, the this shortcut can be used to toggle between Free and Aligned handle types.
Set Goal Weight
Reference
This sets the “goal weight” of selected control points, which is used when a curve has Soft Body physics, forcing the curve to “stick” to their original positions, based on the weight.
Smooth
Reference
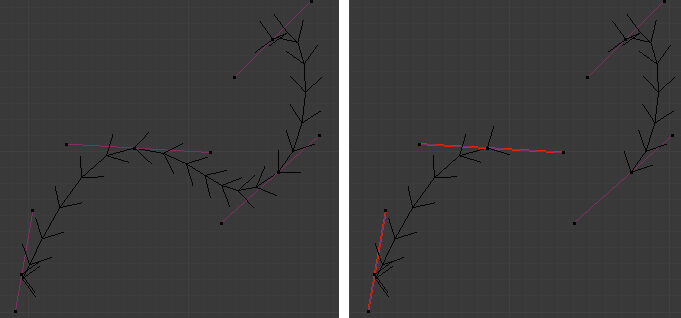
Curve smoothing is available through the specials menu. For Bézier curves, this smoothing operation reduces the distance between the selected control point/s and their neighbors, while keeping the neighbors anchored. Does not effect control point tangents.

Original, unsmoothed Curve.

Entire curve smoothed over 200 times by holding Shift-R to repeat last step.

Only three control points in the center smoothed over 200 times.
Segments
Subdivision
Reference
Curve subdivision simply subdivides all selected segments by adding one or more control points between the selected segments.
- Number of Cuts
- The number of cuts can be adjusted from the Operator panel.
Switch Direction
Reference
This tool will “reverse” the direction of any curve with at least one selected element (i.e. the start point will become the end one, and vice versa). This is mainly useful when using a curve as path, or using the bevel and taper options.
Show/Hide
When in Edit Mode, you can hide and reveal elements from the display. You can only show or hide control points, as segments are always shown, unless all control points of the connected curve are hidden, in which case the curve is fully hidden.
See Show/Hide in Object Mode. See also the Curve Display panel.
Set Spline Type
Reference

Set Spline Type button.
You can convert splines in a curve object between Bézier, NURBS, and Poly curves.
Press T to bring up the Tool Shelf. Clicking on the Set Spline Type
button will allow you to select the Spline type (Poly, Bézier or NURBS).
Note, this is not a “smart” conversion, i.e. Blender does not try to keep the same shape, nor the same number of control points. For example, when converting a NURBS to a Bézier, each group of three NURBS control points become a unique Bézier one (center point and two handles).
See also
Convert To/from Mesh.
Curve Parenting
Reference
Ctrl-PYou can make other selected objects children
of one or three control points Ctrl-P, as with mesh objects.
To select a mesh (that is in view) while editing a curve, Ctrl-P click on it.
Select either one or three control points,
then Ctrl-RMB the object and use Ctrl-P to make a vertex parent.
Selecting three control points will make the child follow
the median point between the three vertices. An alternative would be to use a
Child of Constraint.
See also the Curve Modifier.


