Introduction
IK simplifies the animation process, and makes it possible to make more advanced animations with lesser effort.
IK allows you to position the last bone in a bone chain and the other bones are positioned automatically. This is like how moving someone’s finger would cause his arm to follow it. By normal posing techniques, you would have to start from the root bone, and set bones sequentially till you reach the tip bone: When each parent bone is moved, its child bone would inherit its location and rotation. Thus making tiny precise changes in poses becomes harder farther down the chain, as you may have to adjust all the parent bones first.
This effort is effectively avoided by use of IK.
Automatic IK
Reference
Automatic IK is a tool for quick posing, it can be enabled in the tool shelf in the 3D View, when in pose mode. When the Auto IK option is enabled, translating a bone will activate inverse kinematics and rotate the parent bone, and the parent’s parent, and so on, to follow the selected bone. The IK chain can only extend from a child to a parent bone if the child is connected to it.
The length of the chain is increased
(if there is a connected parent available to add to it)
with Ctrl-PageUp or Ctrl-WheelDown,
and decreased with Ctrl-PageDown or Ctrl-WheelUp.
However, the initial chain length is 0, which effectively
means follow the connections to parent bones as far as possible, with no length limit.
So pressing Ctrl-PageUp the first time sets the chain length to 1 (move only the selected bone),
and pressing Ctrl-PageDown at this point sets it back to 0 (unlimited) again.
Thus, you have to press Ctrl-PageUp more than once from the initial state
to set a finite chain length greater than 1.
This is a more limited feature than using an IK constraint, which can be configured, but it can be useful for quick posing.
IK Constraints
IK is mostly done with bone constraints. They work by the same method but offer more choices and settings. Please refer to these pages for detail about the settings for the constraints:
Armature IK Panel
Reference
This panel is used to select the IK Solver type for the armature. Standard or iTaSC.
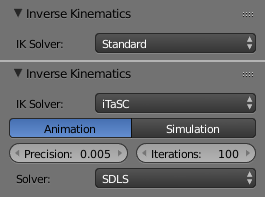
The armature IK panel.
Most the time people will use the Standard IK solver. There is some documentation for the iTaSC “instantaneous Task Specification using Constraints” IK solver here.
See also
Bone IK Panel
Reference
This panel is used to control how the Pose Bones work in the IK chain.
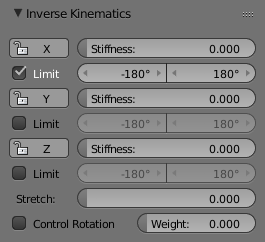
The bone IK panel.
- Lock
- Disallow movement around the axis.
- Stiffness
- Stiffness around the axis. Influence disabled if using Lock.
- Limit
- Limit movement around the axis.
- Stretch
- Stretch influence to IK target.
Arm Rig Example
This arm uses two bones to overcome the twist problem for the forearm.
IK locking is used to stop the forearm from bending,
but the forearm can still be twisted manually by pressing R-Y-Y in Pose Mode,
or by using other constraints.
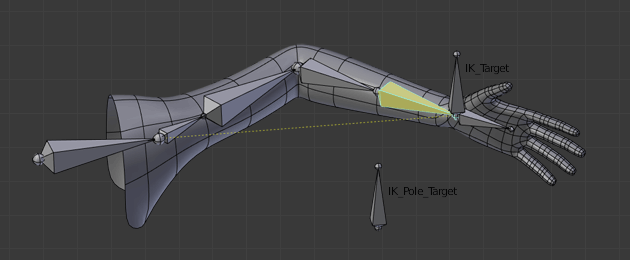
Note that, if a Pole Target is used, IK locking will not work on the root boot.