Subdivision Surface Modifier
The Subdivision Surface Modifier is used to split the faces of a mesh into smaller faces giving a smooth appearance. Using this modifier, enables you to model complex smooth surfaces with simple, low-vertex meshes. This allows high resolution mesh modeling without the need to save and maintain huge amounts of data and gives a smooth organic look to the object.
This process creates virtual geometry that is generated non-destructively without modifying the original mesh, but it can be converted to real geometry that you could edit with the Apply button.
Also, like the rest of the Modifiers, order of execution has an important bearing on the results. For this, see the documentation on the modifier stack.
Keep in mind that this is a different operation than its companion, Smooth Shading. You can see the difference between the two in the grid image below.
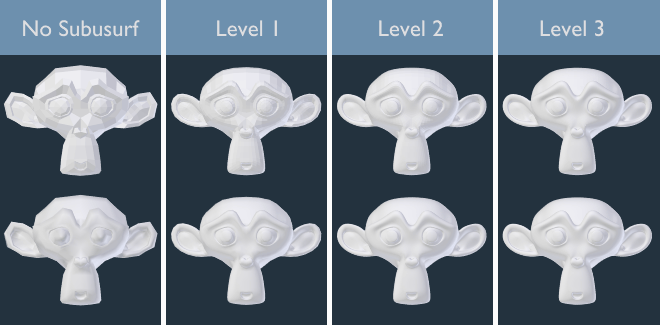
Subdivisions levels 0 to 3, without and with Smooth Shading.
Tip
The Subdivision Surface Modifier does not allow you to edit the new subdivided geometry without applying it, but the Multiresolution Modifier does (in sculpt mode).
Options
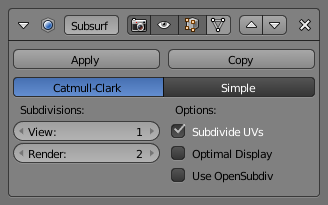
Modifier’s Panel.
- Type
This toggle button allows you to choose the subdivision algorithm:
- Catmull-Clark
- The default option, subdivides and smooths the surfaces. According to its Wikipedia page, the “arbitrary-looking formula was chosen by Catmull and Clark based on the aesthetic appearance of the resulting surfaces rather than on a mathematical derivation.”
- Simple
- Only subdivides the surfaces, without any smoothing (the same as , in Edit Mode). Can be used, for example, to increase base mesh resolution when using displacement maps.
- Subdivisions
Recursively adds more geometry. For details on polygon counts, see the Performance Considerations section.
- View
- The number of subdivision levels shown in the 3D View.
- Render
- The number of subdivision levels shown in renders.
The right combination of these settings will allow you to keep a fast and lightweight approximation of your model when interacting with it in 3D, but use a higher quality version when rendering.
Tip
Be careful not to set the View subdivisions higher than the Render subdivisions, this would mean the 3D View will be higher quality than the render.
- Options
- Subdivide UVs
- When enabled, the UV maps will also be subdivided (i.e. Blender will add “virtual” coordinates for all sub-faces created by this modifier).
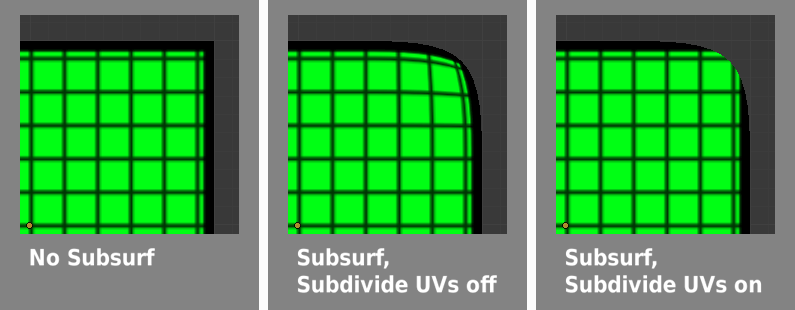
Subdivide UVs on and off.
- Optimal Display
- When drawing the wireframe of this object, the wires of the new subdivided edges will be skipped (only draws the edges of the original geometry)
- Opensubdiv
- See the OpenSubdiv section.
OpenSubdiv
When OpenSubdiv is enabled, the modifier evaluation will happen on a compute device. To enable OpenSubdiv you must first choose the fastest compute device in the User Preferences. Most of the time the best performance will be achieved when using GLSL. As a result performance of the modifier will be much higher which is great for animations.
See also
To find more on OpenSubdiv read the Release Notes.
Improving Performance
In order to utilize maximum performance form OpenSubdiv the following things are required:
- The modifier must be last in the modifier stack.
- There should be no modifiers prior to the which changes mesh topology across the time.
- Other objects should not use geometry of OpenSubdiv mesh
Control
Catmull-Clark subdivision rounds off edges, and often this is not what you want. There are several solutions that allow you to control the subdivision.
Weighted Edge Creases
Weighted edge creases for subdivision surfaces allows you to change the way the Subdivision Surface modifier subdivides the geometry to give the edges a smooth or sharp appearance.
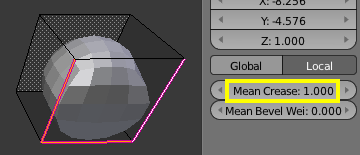
A Subdivided Cube with Creased Edges.
The crease weight of selected edges can be changed in the Transform panel of the properties region
N, or by using the shortcut Shift-E and moving the mouse closer
or further from the selected edges to adjust the crease weight.
A higher value makes the edge “stronger” and more resistant to the smoothing effect of subdivision surfaces.
Edge Loops
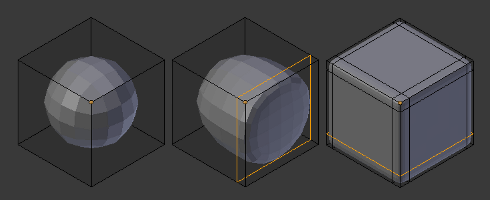
Subdivision Level 2 Cube, the same with an extra Edge Loop, and the same with six extra Edge Loops.
The Subdivision Surface Modifier demonstrates why good, clean topology is so important.
As you can see in the figure, the Subdivision Surface Modifier has a drastic effect on a default Cube.
Until you add in additional Loops (with Ctrl-R), the shape is almost unrecognizable as a cube.
A mesh with deliberate topology has good placement of Edge Loops,
which allow the placement of more Loops (or removal of Loops,
with X ) to control the sharpness/smoothness of the resultant mesh.
Performance Considerations
Higher levels of subdivisions mean more vertices, and more vertices means more memory will be used (both video memory for display (VRAM), and system RAM for rendering). Blender could potentially crash or hang if you do not have enough memory.
When using high levels of subdivision with a graphics card that has a low total amount of VRAM, some parts of the geometry will disappear visually. Your mesh will actually be intact, because the render is generated using your Object Data, (even though it cannot be shown by your graphics card).
Tip
To improve performance in the viewport try enabling OpenSubdiv or if you are using the Cycles render engine consider using Adaptive Subdivision
Keyboard Shortcuts
To quickly add a Subdivision Surface Modifier to one or more objects, select it/them and press Ctrl-1.
That will add a Subdivision Surface Modifier with View Subdivisions on 1.
You can use other numbers too, such as Ctrl-2, Ctrl-3, etc,
to add a Subdivision Surface Modifier with that number of subdivisions.
The Render Subdivisions will always be on 2 when added like this.
If an object already has a Subdivision Surface Modifier, doing this will simply change its subdivision level instead of adding another modifier.
Known Limitations
Non Contiguous Normals
Blender’s subdivision system produces nice smooth subdivided meshes, but any subdivided face (that is, any small face created by the algorithm from a single face of the original mesh), shares the overall normal orientation of that original face.
Abrupt normal changes can produce ugly black gouges even though these flipped normals are not an issue for the shape itself.
A quick way to fix this is to use Blender’s Recalculate Normals operation in Edit Mode.
If you still have some ugly black gouges you will have to Manually Flip the Normals.
Concave N-Gons
While n-gons are supported, concave n-gons may give ugly overlapping results.
