Introduction
Light would not even exist without its counterpart: shadows. Shadows are a darkening of a portion of an object because light is being partially or totally blocked from illuminating the object. They add contrast and volume to a scene; there is nearly no place in the real world without shadows, so to get realistic renders, you will need them. Blender supports the following kinds of shadows:
Ambient occlusion really is not a shadow based on light per se, but based on geometry. However, it does mimic an effect where light is prevented from fully and uniformly illuminating an object, so it is mentioned here. Also, it is important to mention ambient lighting, since increasing Ambient decreases the effect of a shadow.
You can use a combination of ray-traced and buffer shadows to achieve different results. Even within ray-traced shadows, different lamps cast different patterns and intensities of shadow. Depending on how you arrange your lamps, one lamp may wipe out or override the shadow cast by another lamp.
Shadows is one of those trifectas in Blender, where multiple things have to be set up in different areas to get results:
- The lamp has to cast shadows (ability and direction).
- An opaque object has to block light on its way (position and layer).
- Another object’s material has to receive shadows (Shadow and Receive Transparent enabled).
- The render engine has to calculate shadows (Shadow for buffered shadows, Shadow and Ray for ray-traced shadows).
For example, the simple Lamp, Area, and Sun light has the ability to cast ray shadows, but not buffer shadows. The Spot light can cast both, whereas the Hemi light does not cast any. If a Sun lamp is pointing sideways, it will not cast a shadow from a sphere above a plane onto the plane, since the light is not traveling that way. All lamps able to cast shadows share some common options, described in the Shadow Panel.
Just to give you more shadow options (and further confuse the issue), lamps and materials can be set to respectively only cast and receive shadows, and not light the diffuse/specular aspects of the object. Also, render layers can turn on/off the shadow pass, and their output may or may not contain shadow information...
Lamps: Ray-traced Shadows
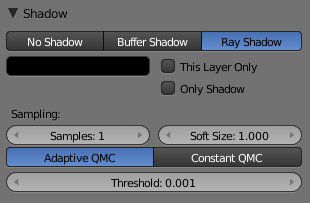
Ray Shadow enabled for a lamp.
Ray-traced shadows produce very precise shadows with very low memory use, but at the cost of processing time. This type of shadowing is available to all lamp types except Hemi.
As opposed to buffered shadows (Lamps: Buffered Shadows), ray-traced shadows are obtained by casting rays from a regular light source, uniformly and in all directions. The ray-tracer then records which pixel of the final image is hit by a ray light, and which is not. Those that are not are obviously obscured by a shadow.
Each light casts rays in a different way. For example, a Spot light casts rays uniformly in all directions within a cone. The Sun light casts rays from an infinitely distant point, with all rays parallel to the direction of the Sun light.
For each additional light added to the scene, with ray-tracing enabled, the rendering time increases. Ray-traced shadows require more computation than buffered shadows but produce sharp shadow borders with very little memory resource usage.
To enable ray-traced shadows, three actions are required:
Enable Shadows globally in the Render menu’s Shading panel.
Enable Ray tracing globally from the same panel.
Enable ray-traced shadows for the light using the Ray Shadow button in the Light menu’s Shadow panel. This panel varies depending on the type of light.
All lamps able to cast ray-traced shadows share some common options, described in Ray-traced Properties.
Ray-traced shadows can be cast by the following types of lamp:
Lamps: Buffered Shadows
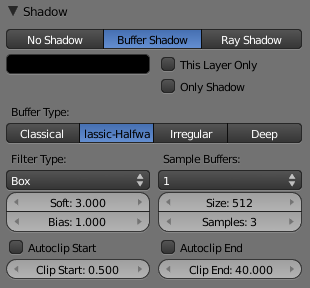
Buffer Shadow enabled for a Spot lamp.
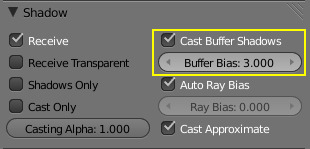
Cast Buffer Shadows enabled for a material.
Buffered shadows provide fast-rendered shadows at the expense of precision and/or quality. Buffered shadows also require more memory resources as compared to ray tracing. Using buffered shadows depends on your requirements. If you are rendering animations or cannot wait hours to render a complex scene with soft shadows, buffer shadows are a good choice.
For a scanline renderer – and Blender’s built-in engine is, among other things, a scanline renderer – shadows can be computed using a shadow buffer. This implies that an “image”, as seen from the spot lamp’s point of view, is “rendered” and that the distance – in the image – for each point from the spot light is saved. Any point in the “rendered” image that is farther away than any of those points in the spot light’s image is then considered to be in shadow. The shadow buffer stores this image data.
To enable buffered shadows these actions are required:
- Enable shadows globally from the Scene menu’s Gather panel by selecting Approximate.
- Enable shadows for the light using the Buffer Shadow button in the Lamp menu’s Shadow panel.
- Make sure the Cast Buffer Shadows options is enabled in each Material ‘s Shadow panel.
- The Spot lamp is the only lamp able to cast buffered shadows.