Adding Geometry
In Blender, for modeling, you have several ways of adding mesh elements.
Duplicate or Extrude to Cursor
Reference
Ctrl-LMBInteractively places new vertices with Ctrl-LMB at the cursor position.
Creating Vertices
The most basic element, a vertex, can be added with a left button mouse click while pressing Ctrl
when no other vertices are selected, or Ctrl-LMB.
Because the camera space (computer screen) is two-dimensional,
Blender cannot determine all three vertex coordinates from a single mouse click,
so the new vertex is placed at the depth of the 3D cursor.
To create interconnected vertices, you can add a vertex and continuously make subsequent Ctrl-LMB
operations with the last one vertex selected.
This will link the last selected vertex with the vertex created at the mouse position with an edge
(See Fig. Adding vertices one by one.),
and will continuously connect them creating vertices if you continue repeating this operation.
(see Fig. 3 Creating simple connected vertices with Ctrl-LMB).
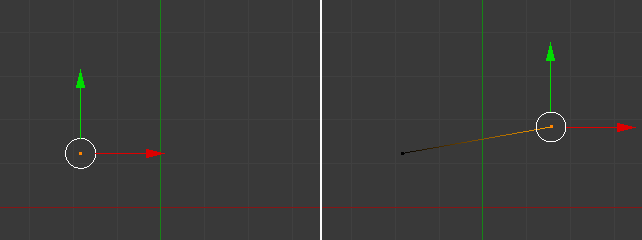
Adding vertices one by one.
Creating Faces
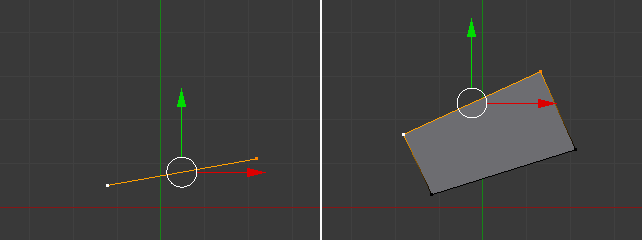
Quad from an Edge with source automatically rotated.
If you have two vertices selected and already connected with an edge, left-click while pressing Ctrl-LMB
will create a planar face, also known as a quad. Blender will follow your mouse cursor
and will use the planar view from your viewport to create those quads.
For Ctrl-LMB, Blender will automatically rotate the last selected Edge (the source)
for the subsequent operations if you have at least one face created, dividing the angles created between
the newly-created edge and the last two edges, performing a smooth angle between them. Blender will calculate
this angle using the last positive and negative position of the last X and Y coordinates
and the last connected unselected edge. If this angle exceeds a negative limit (following a quadrant rule)
between the recently created edge and the last two, Blender will wrap the faces.
But if you do not want Blender rotating and smoothing edges automatically when extruding from Ctrl-LMB,
you can also inhibit Blender from rotating sources using the shortcut Ctrl-Shift-LMB.
In this case, Blender will not rotate the source dividing the angle between those edges when creating a face.
For both cases, Blender will inform the user about the source rotation during the creation process.
If you look at the Bottom of the Mesh Tools Panel, if you press Ctrl-LMB,
you will see that the Rotate Source is automatically checked and if Ctrl-Shift-LMB is used,
it will be automatically unchecked. Examples:
- Creating Faces with shortcut
Ctrl-LMB, (see Fig. - Faces created with source automatically rotated) - Creating Faces with shortcut
Ctrl-Shift-LMB, (see Fig. Faces created with no source rotation)
If you have three or more vertices selected, and left click with mouse while pressing Ctrl-LMB,
you will also create planar faces, but along the vertices selected, following the direction of the cursor.
This operation is similar to an extrude operation,
which is explained in the Extrude page.
Tip
When adding Objects with Ctrl-LMB, The extrusions of the selected elements,
being vertices, edges and faces with the Ctrl-LMB, is viewport dependent.
This means, once you change your viewport, for example, from top to left, bottom or right,
the extrusion direction will also follow your viewport and align your extrusions with your planar view.
See also