Mapping
Textures need mapping coordinates, to determine how they are applied to the object. The mapping specifies how the texture will ultimately wrap itself to the object.
For example, a 2D image texture could be configured to wrap itself around a cylindrical shaped object.
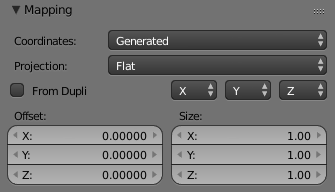
Mapping panel.
Coordinates
Mapping works by using a set of coordinates to guide the mapping process. These coordinates can come from anywhere, usually the object to which the texture is being applied to.
- Global
- The scene’s global 3D coordinates. This is also useful for animations; if you move the object, the texture moves across it. It can be useful for letting objects appear or disappear at a certain position in space.
- Object
Uses an object as source for coordinates. Often used with an Empty, this is an easy way to place a small image at a given point on the object. This object can also be animated, to move a texture around or through a surface.
- Object
- Select the name of an object.
- Generated
- The original undeformed coordinates of the object. This is the default option for mapping textures.
- UV
UV mapping is a very precise way of mapping a 2D texture to a 3D surface. Each vertex of a mesh has its own UV co-ordinates which can be unwrapped and laid flat like a skin. You can almost think of UV coordinates as a mapping that works on a 2D plane with its own local coordinate system to the plane on which it is operating on. This mapping is especially useful when using 2D images as textures, as seen in UV Mapping. You can use multiple textures with one set of UV coordinates.
- UV Map
- UV map to use for mapping.
- Strand/Particle
- Uses normalized 1D strand texture coordinate or particle age (X) and trail position (Y). Use when texture is applied to hair strands or particles.
- Window
- The rendered image window coordinates. This is well suited to blending two objects.
- Normal
- Uses the direction of the surface’s normal vector as coordinates. This is very useful when creating certain special effects that depend on viewing angle.
- Reflection
- Uses the direction of the reflection vector as coordinates. This is useful for adding reflection maps. You will need this input when Environment Mapping.
- Stress
- Uses the difference of edge length compared to original coordinates of the mesh. This is useful, for example, when a mesh is deformed by modifiers.
- Tangent
- Uses the optional tangent vector as texture coordinates.
Projection
- Flat
- Flat mapping gives the best results on single planar faces. It does produce interesting effects on the sphere, but compared to a sphere-mapped sphere the result looks flat. On faces that are not in the mapping plane the last pixel of the texture is extended, which produces stripes on the cube and cylinder.
- Cube
- Cube mapping often gives the most useful results when the objects are not too curvy and organic (notice the seams on the sphere).
- Tube
- Tube mapping maps the texture around an object like a label on a bottle. The texture is therefore more stretched on the cylinder. This mapping is of course very good for making the label on a bottle or assigning stickers to rounded objects. However, this is not a cylindrical mapping so the ends of the cylinder are undefined.
- Sphere
- Sphere mapping is the best type for mapping a sphere, and it is perfect for making planets and similar objects. It is often very useful for creating organic objects. It also produces interesting effects on a cylinder.
Inheriting coordinates from the parent object
- From Dupli
- Duplis instanced from vertices, faces, or particles, inherit texture coordinates from their parent.
Coordinate Offset, Scaling and Transformation
- Offset
- The texture co-ordinates can be translated by an offset. Enlarging of the Offset moves the texture towards the top left.
- Size
These buttons allow you to change the mapping of axes between the texture’s own coordinate system, and the mapping system you choose (Generated, UV, etcetera.) More precisely, to each axis of the texture corresponds one of four choices, that allow you to select to which axis in the mapping system it maps! This implies several points:
- For 2D textures (such as images), only the first two rows are relevant, as they have no Z data.
- You can rotate a 2D picture a quarter turn by setting the first row (i.e. X texture axis) to Y, and the second row (Y texture axis) to X.
- When you map no texture axis (i.e. the three “void” buttons are set), you will get a solid uniform texture, as you use zero dimension (i.e. a dot, or pixel) of it (and then Blender extends or repeats this point’s color along all axes.)
- When you only map one texture axis (i.e. two “void” buttons are enabled) you will get a “striped” texture, as you only use one dimension (i.e. a line of pixel) of it, (and then Blender stretches this line along the two other axes).
- The same goes, for 3D textures (i.e. procedural ones), when one axis is mapped to nothing, Blender extends the plan (“slice”) along the relevant third axis.